


Craft Errata: Slow Knitting
Regarding the Luma pattern:
p.139 – ABBREVIATIONS
Dec3R: Slip 3 sts to cn and hold parallel to and behind left-hand needle; insert right-hand needle into first st on let-hand needle purlwise, then into first st on cn purlwise; purl these 2 sts together; [insert right-hand needle into first st on cn, then into first st on left-hand needle; knit these 2 sts together] twice — 3 sts decreased.
Dec3L: Slip 3 sts to cn and hold parallel to and in fron tof left-hand needle; [insert right-hand needle into first st on cn, then into first st on left-hand neelde; knit these 2 sts together] twice; tranfer rem st on cn to left-hand needle, p2tog. — 3 sts decreased.
p.140 – Tubular CO
Row 2: P1, k1, [slip 1 wyif, k1; repeat from ] to last 2 sts, slip 1 wyif, p1.
Row 3: K2, [slip wyif, k1; repeat from ] to end.
Ribbing Set-Up Row 2: Slip 1 wyif, k11, [p2, k2; repeat form ] to last 2 sts, p2.
p.140 – Shape Side and Change to Charts B and C
AT THE SAME TIME, when piece measures approximately 20¼ (20¼, 20¼, 21¼, 21¼, 21¼, 21¼)” [51.5 (51.5, 51.5, 54, 54, 54, 54) cm] from the beginning, ending with Row 2 of Chart A, change to Chart B between markers; work Rows 1–10 of Chart B once, Row 3-10 tree times, then Rows 3 and 4 one more time. Change to Chart C between markers; work Rows 1 and 2 of Chart C once—74 (77, 83, 86, 89, 98, 101) sts. Piece should measure approximately 25 (25, 25, 26, 26, 26, 26)” [63.5 (63.5, 63.5, 66, 66, 66, 66) cm]. Make note of last row of Texture Pattern worked.
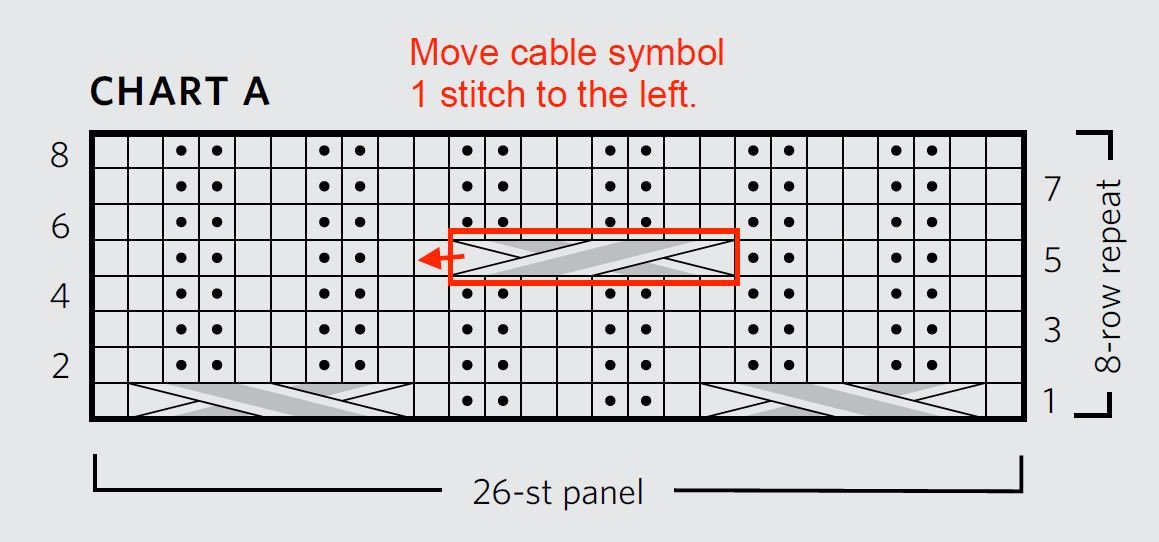
Chart A
Chart A has a cable that is not properly aligned, fix it as follows:
p.142 Shape Raglan Armhole
Our talented TE who re-reviewed, Sue McCain thought this might be a helpful note for you at the end of the Next Row (WS) section: 1 edge stitch at armhole edge, 32 sts in cable pattern, and 12 center front stitches at the end of this row.
Work even, removing marker closest to armhole edge on first row, until armhole measures approximately 7¼ (8¼, 9¼, 9¼, 10¼, 10¼, 11¼)” [18.5 (21, 23.5, 23.5, 26, 26, 28.5) cm], ending with Row 4 of Chart C.
p.142 Shape Collar
Set-Up Row (RS): K1, pm, work Chart D to marker, work to end.
Work even until you have completed Rows 1-8 of Chart D seven times, then work 0 (2, 2, 4, 4, 4, 6) rows of Chart C, beginning with Row 5. Transfer sts to holder.
p.143 Shape Side and Change to Charts B and C
AT THE SAME TIME, when piece measures approximately 20¼ (20¼, 20¼, 21¼, 21¼, 21¼, 21¼)” [51.5 (51.5, 51.5, 54, 54, 54, 54) cm] from the beginning, ending with Row 2 of Chart A, change to Chart B between markers; work Rows 1–10 of Chart B once, Rows 3-10 three times, then Rows 3 and 4 once. Change to Chart C between markers; work Rows 1-3 of Chart C once—74 (77, 83, 86, 89, 98, 101) sts. Piece should measure approximately 25 (25, 25, 26, 26, 26, 26)” [63.5 (63.5, 63.5, 66, 66, 66, 66) cm].
p.143 Shape Raglan Armhole
Next Row (WS): Work 6 sts, remove marker, work 1 st, pm, work to end.
Decrease 1 st on the next RS row, then every other row 4 times, as follows: work to marker, ssk, work to end—45 sts remain.
Work even, removing marker closest to the armhole edge on the first row, until armhole measures approximately 7¼ (8¼, 9¼, 9¼, 10¼, 10¼, 11¼)” [18.5 (21, 23.5, 23.5, 26, 26, 28.5) cm], ending with Row 4 of Chart C.
p.143 Shape Collar
Set-Up Row (RS): Work to marker, sm, work Chart E to last st, pm, k1.
Work even until you have completed Rows 1-8 of Chart E seven times, then work 0_2, 2, 4, 4, 4, 6) rows of Chart C, beginning with Row 5.
Transfer sts to a holder; do not cut yarn.
p.145 Ribbing Set-Up
Ribbing Set-Up Row 1 (RS): [K2, p2; repeat from [ to last 2 sts, k2.
Ribbing Set-Up Row 2: P2, [k2, p2; repeat from [ to end.
Work even for 21 rows.
Change to larger needles.
